LightMate Area 2S Light Meter Photography & OV-X1 17° Retro
LightMate Area 2S Light Meter Photography & OV-X1 17° Retro Viewfinder, 0.96″ Large OLED Screen, Ultra-Compact, Rechargeable Battery, for Leica & Other Film Cameras, Sliver
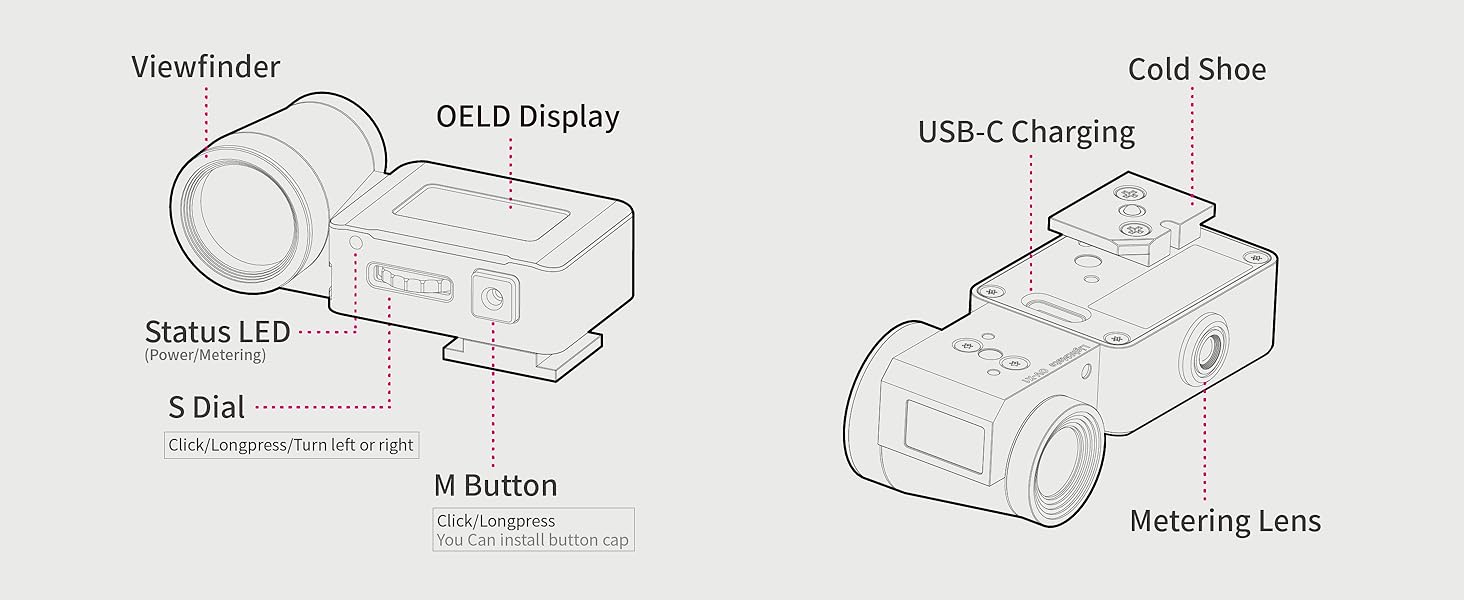
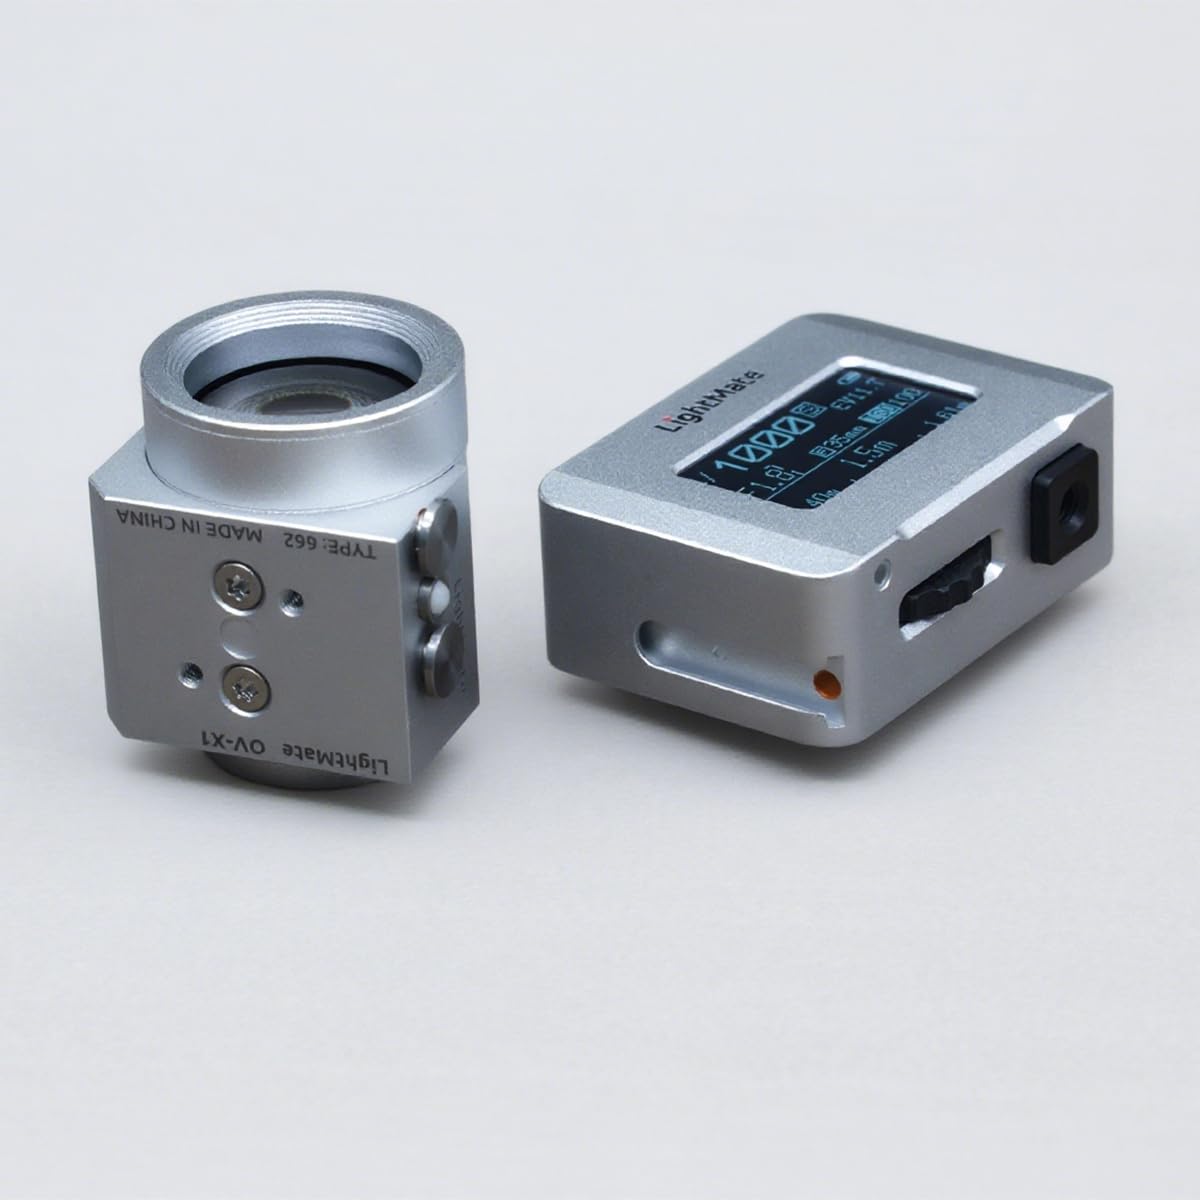
- With the OV-X1 17° Viewfinder – A Viewfinder allow be install on the Area 2S vfPort(TM) interface, for aim at the target to metering.
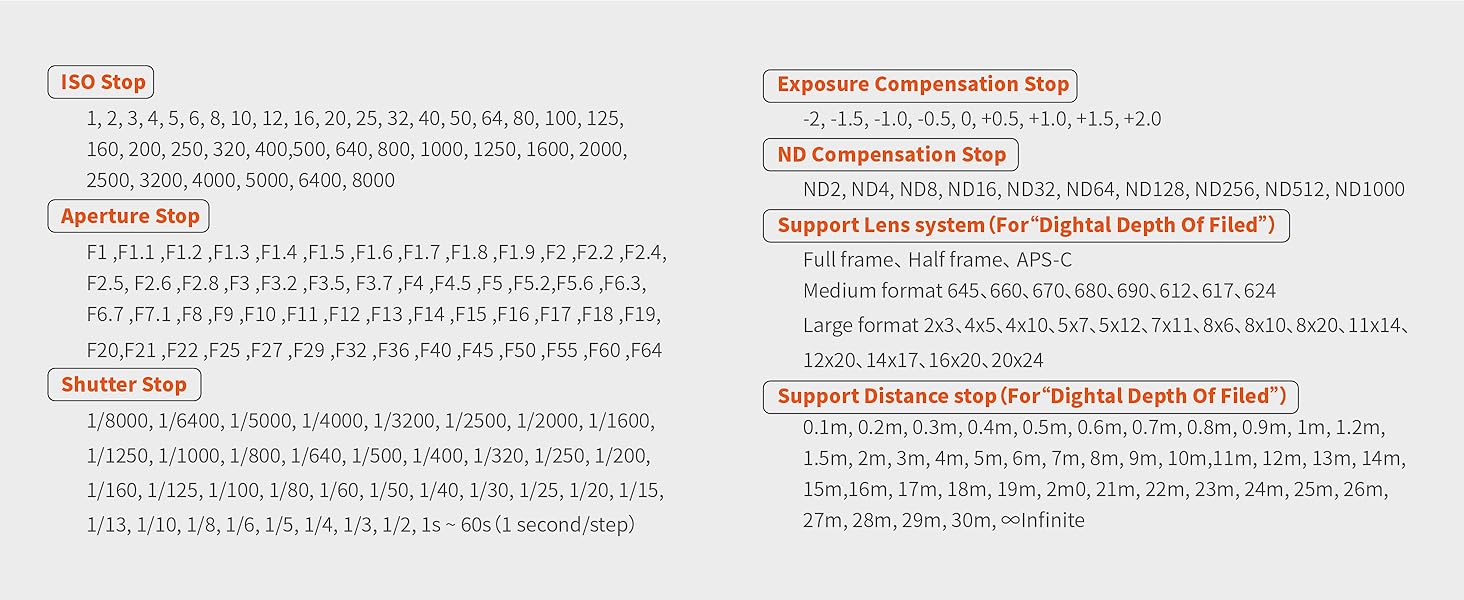
- Adjustable step value of Aperture & ShutterSpeed – The Aperture step value can be switched between Full and X step, and the ShutterSpeed step value can be switched between Full and 1/3 step.
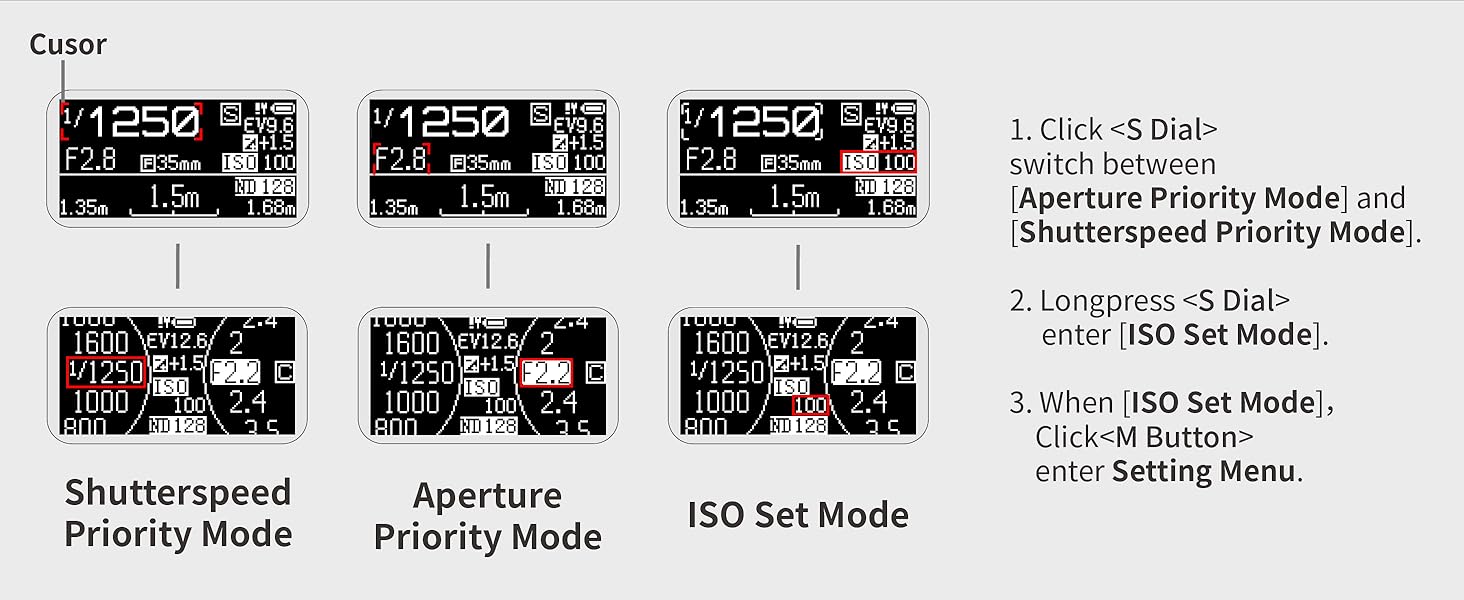
- Aperture Priority Mode & Shutter Priority Mode – Click the M-Button to switch the mode. As long as your camera can manually adjust the aperture and shutter speed, you can use it for metering.
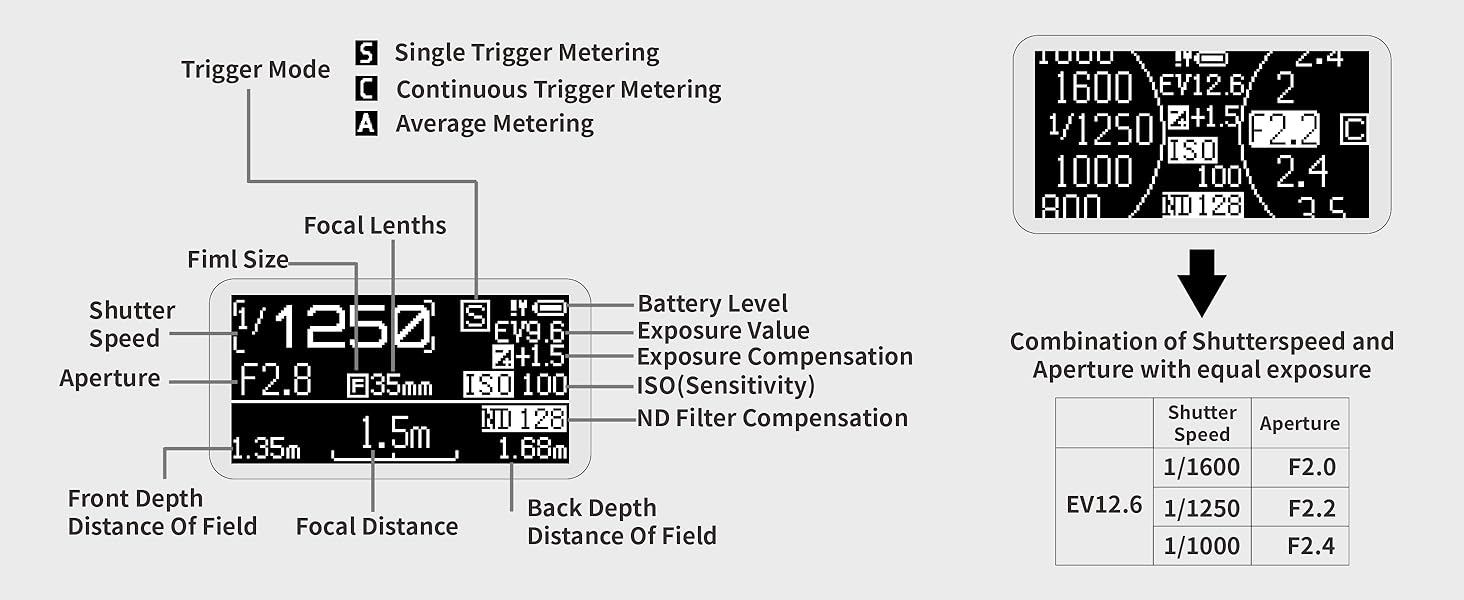
- Single Trigger Metering Mode, Continuous Trigger Metering Mode, and Average Metering Mode – Multiple modes to meet different usage scenarios, more creative space.
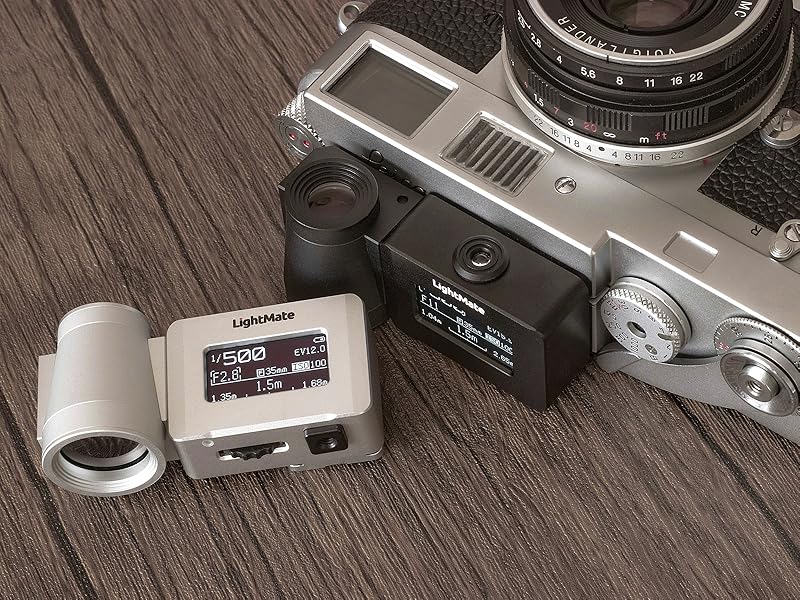
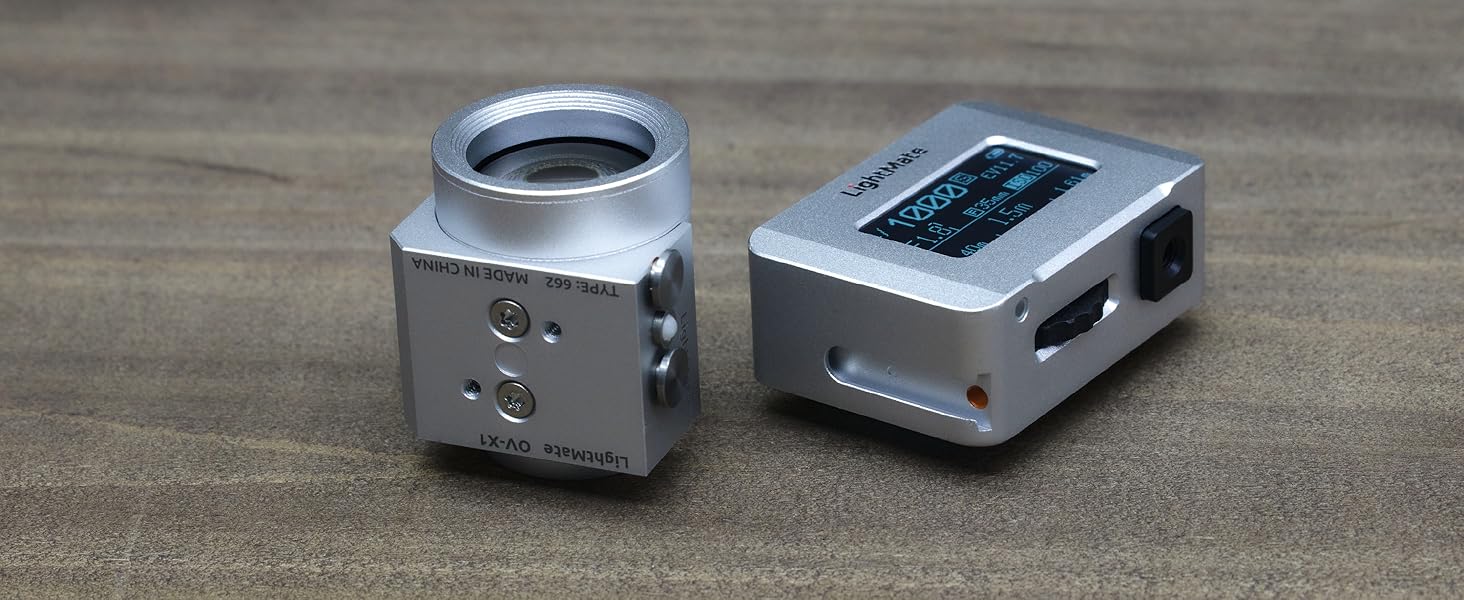
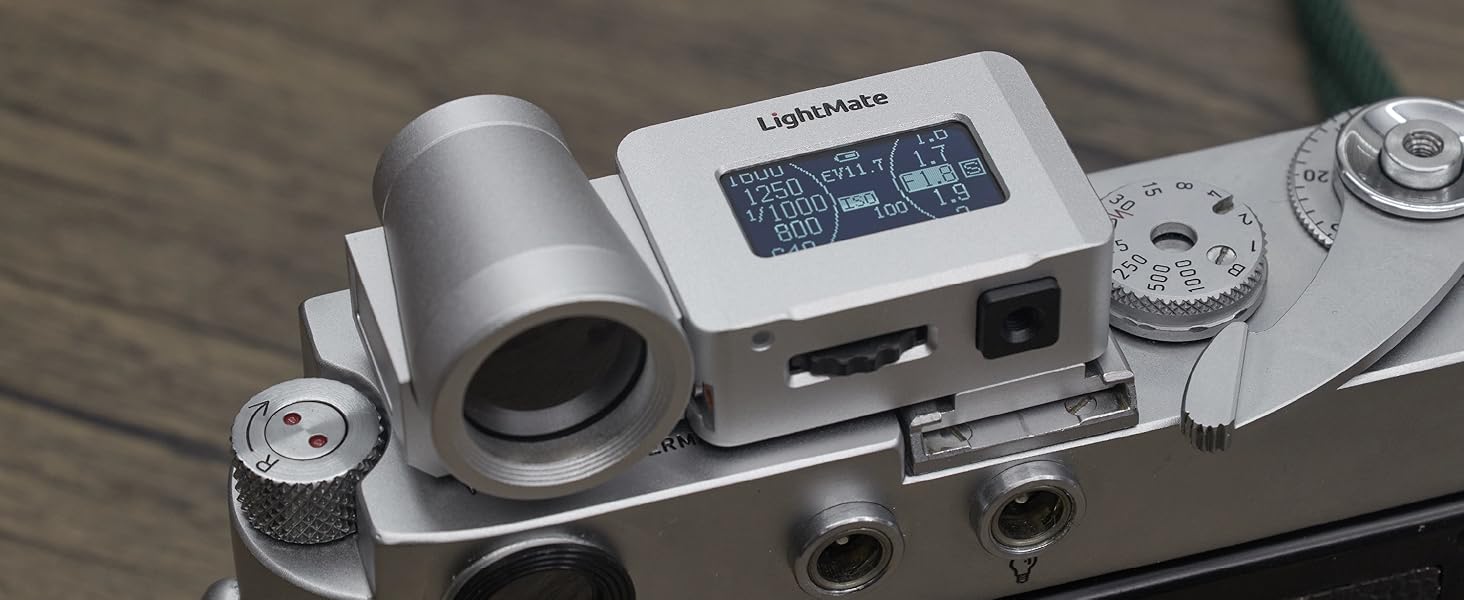
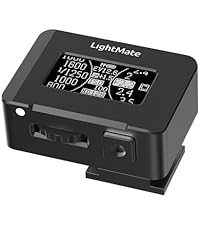
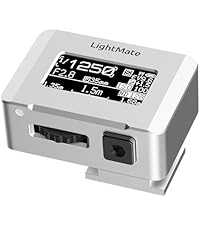
- 0.96" Large OLED Screen – Clear and sharp display, you can increase the screen brightness to increase visibility under the "Settings – LCD & Power menu" when outdoor.
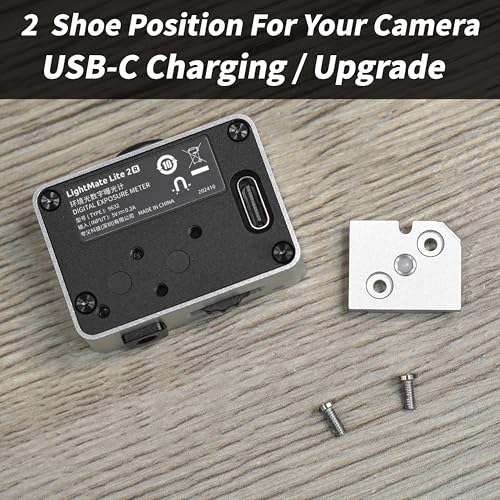
- Built-in Rechargeable Battery – Comprehensive battery life exceeds 20 hours, and it can stand by for more than 6 months when fully charged and turned off, charging via a USB-C cable.
- Exposure Compensation & ND filter compensation – Even if your camera lens is install with an ND filter, don't worry, use compensation funtion.
- Digital Depth Of Field – Using hyperfocal distance for street photography. Simply modify the frame and focal length of the camera lens in the settings, and you can use the depth of field calculation function on the metering interface.
LightMate Area 2S+OV-X1 17° Digital Exposure Meter
Silver Version
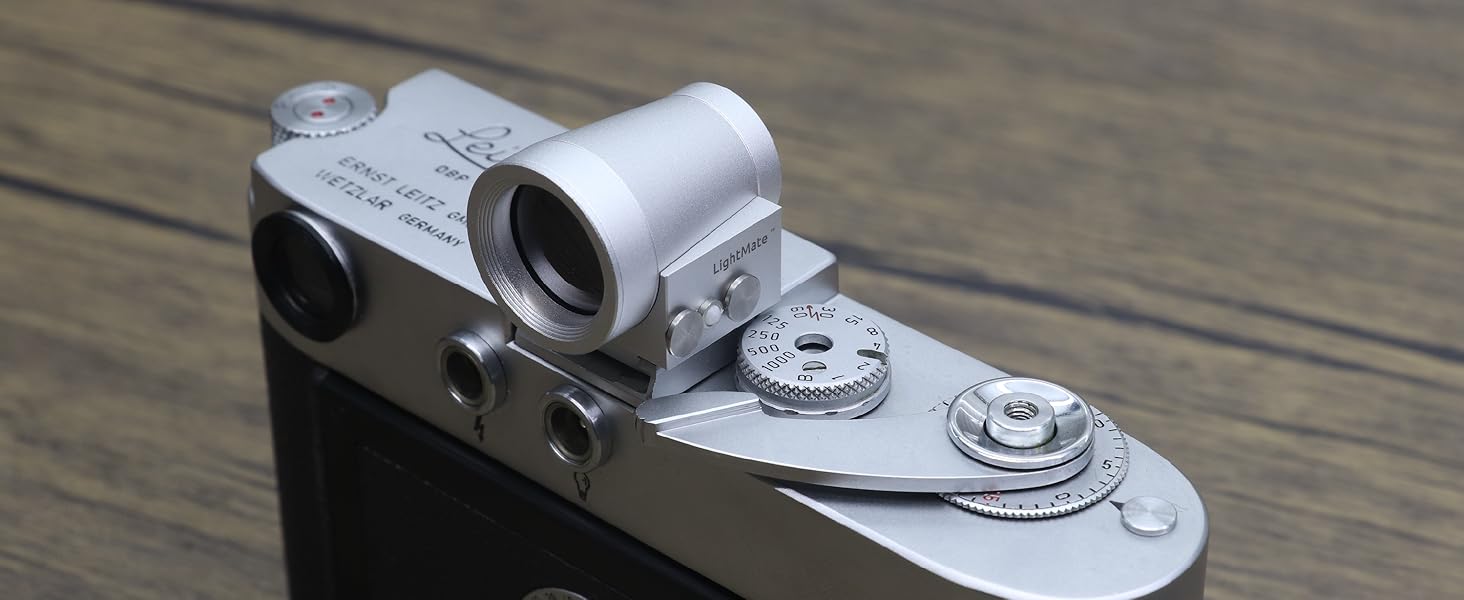
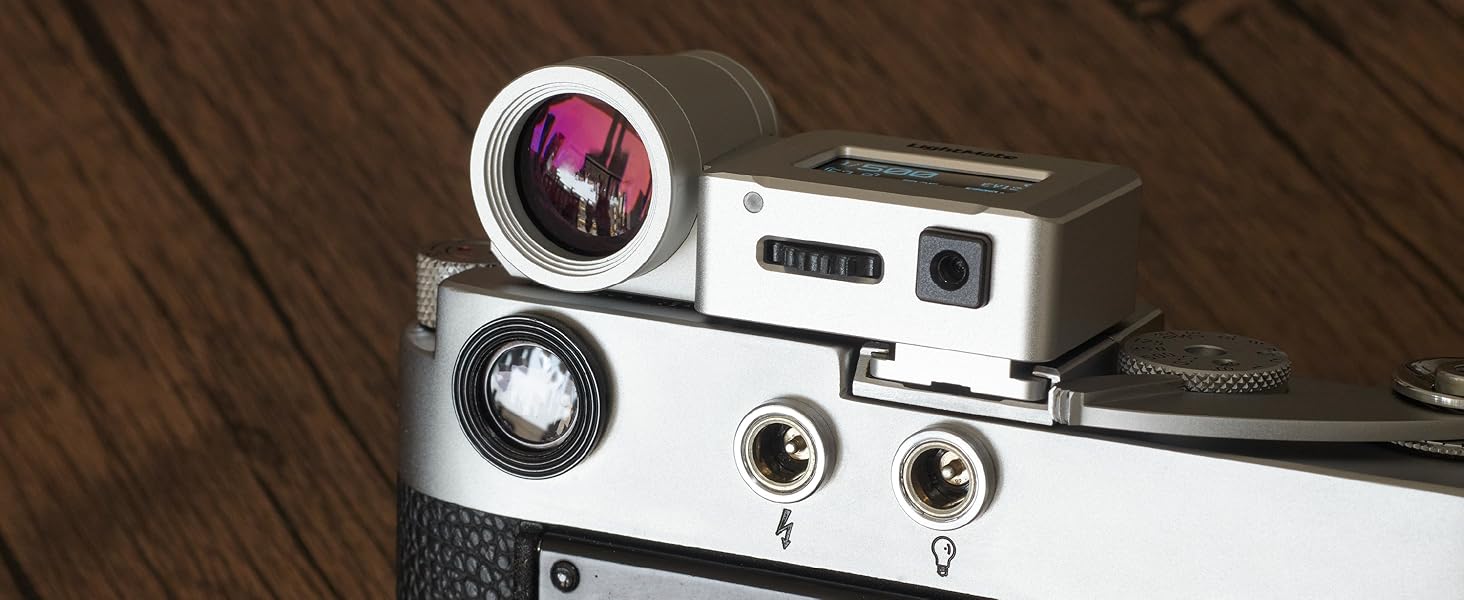
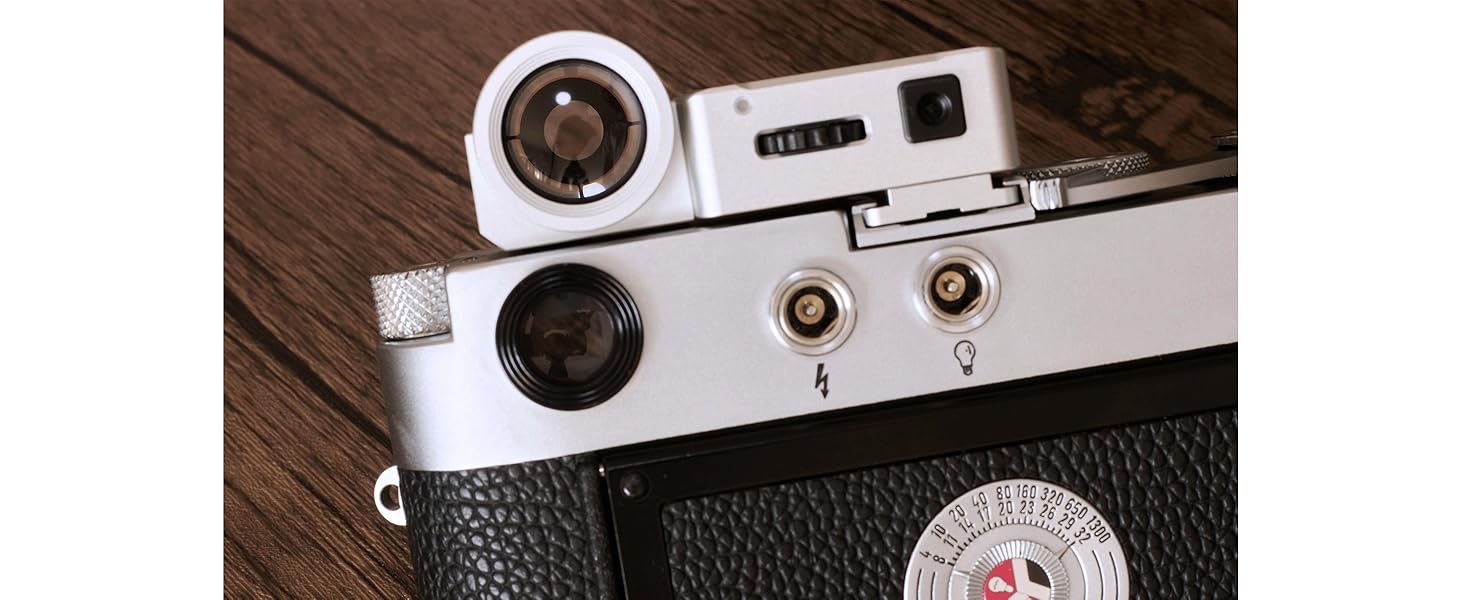
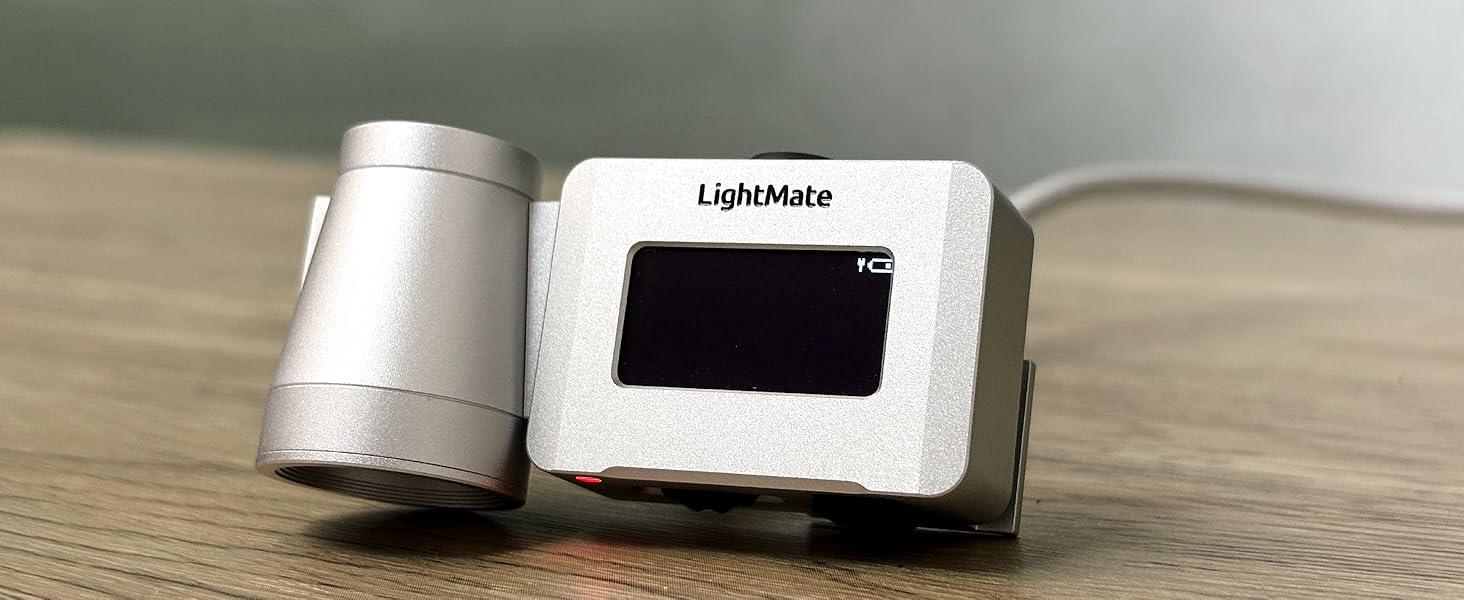
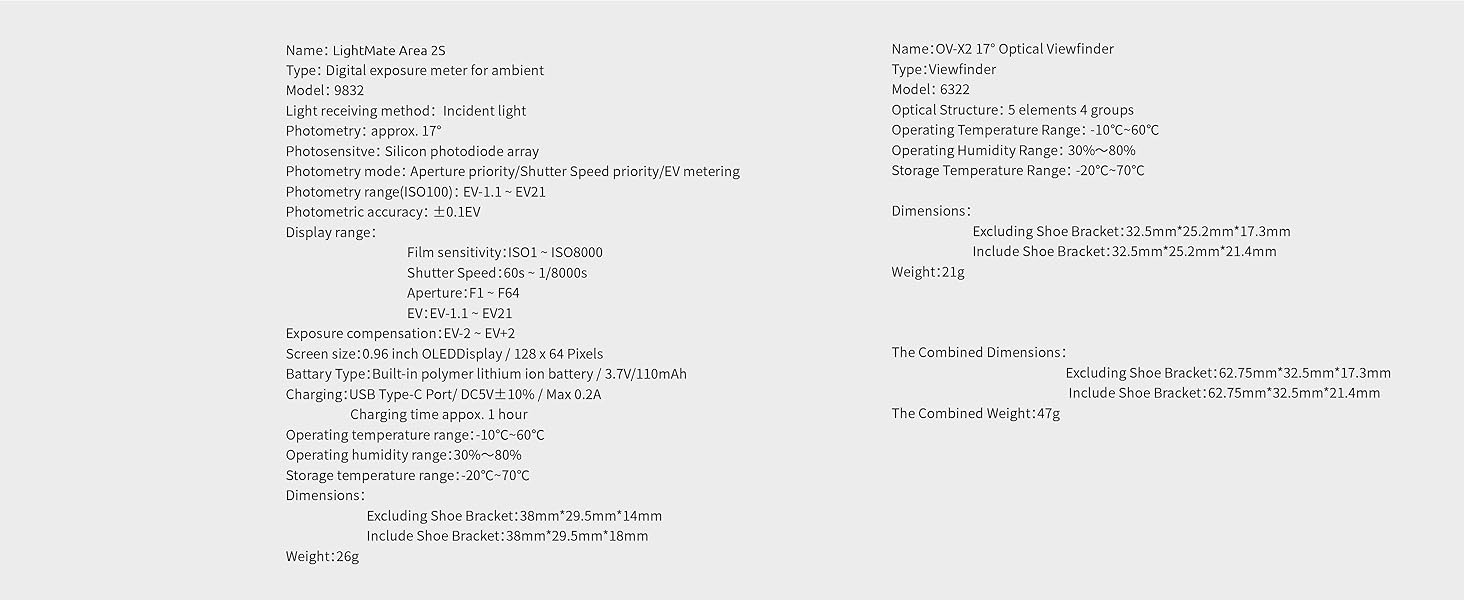
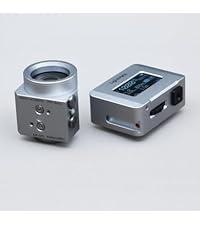
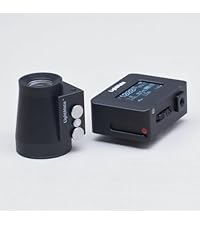
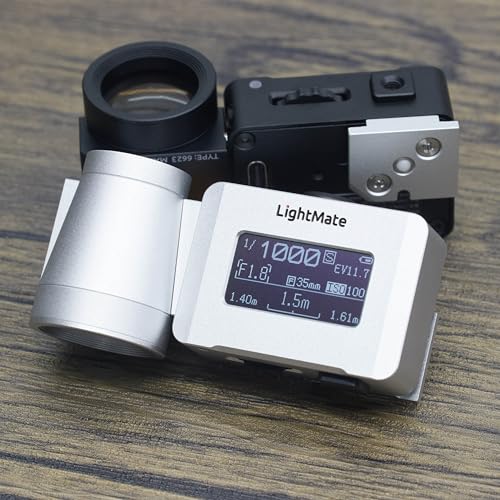
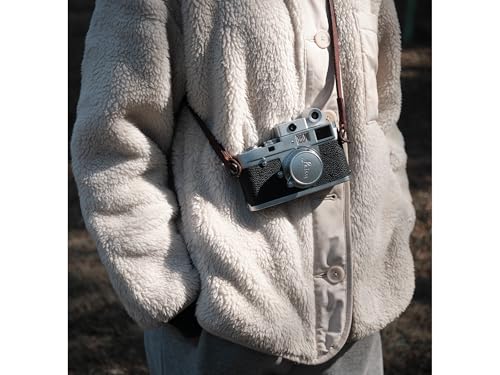
LightMate Area 2S is a reflective light meter with a sturdy and durable all metal body and an ultra portable size! Its metering lens is 17° and comes with an OV-X1 17° viewfinder for precise metering by aiming at the target. Install it on the top of the camera's cold/hot shoe mount for use. Minimalist appearance design, suitable for almost all film cameras.
What's in the box :
LightMate Area 2S *1 ; OV-X1 17° Viewfinder *1 ; USB-C Cable *1 ; Cross Screwdriver *1; Storage Bag *1
Basic product operation
The video showcases the product in use.The video guides you through product setup.The video compares multiple products.The video shows the product being unpacked.Basic product operation
Merchant Video
LightMate series of light meters was first designed in 2019 and officially released in 2021. LightMate focuses on the design and manufacturing of small boot mount metering devices. Innovation, high-end, and high reliability are the design concepts of LightMate series metering products. LightMate series of light meters has undergone years of repeated polishing, and the LightMate Lite series has been improved and released successively as Lite, Lite 2, and Lite 2R, and LightMate Area series such as Area, Area 2s. Since its release, the LightMate series of light meters have gained the love of tens of thousands of photographers worldwide!
You can switch betwen Single Trigger Metering Mode, Continuous Trigger Metering Mode, Average Value Metering Mode.
Average metering mode:Enter the average metering mode, press the metering button, and then move between multiple subjects to obtain the average exposure value of multiple subjects. The average metering mode can be used for multi subject exposure measurement, which is equivalent to expanding the metering angle of LightMate Area 2S.
Exposure Compensation, ND filter Compensation.
Depth Of Field calculate. What a magic tool of hyperfocal distance calculate for street photography.
The Aperture step value can be switched between Full and X step, and the ShutterSpeed step value can be switched between Full and 1/3 step.
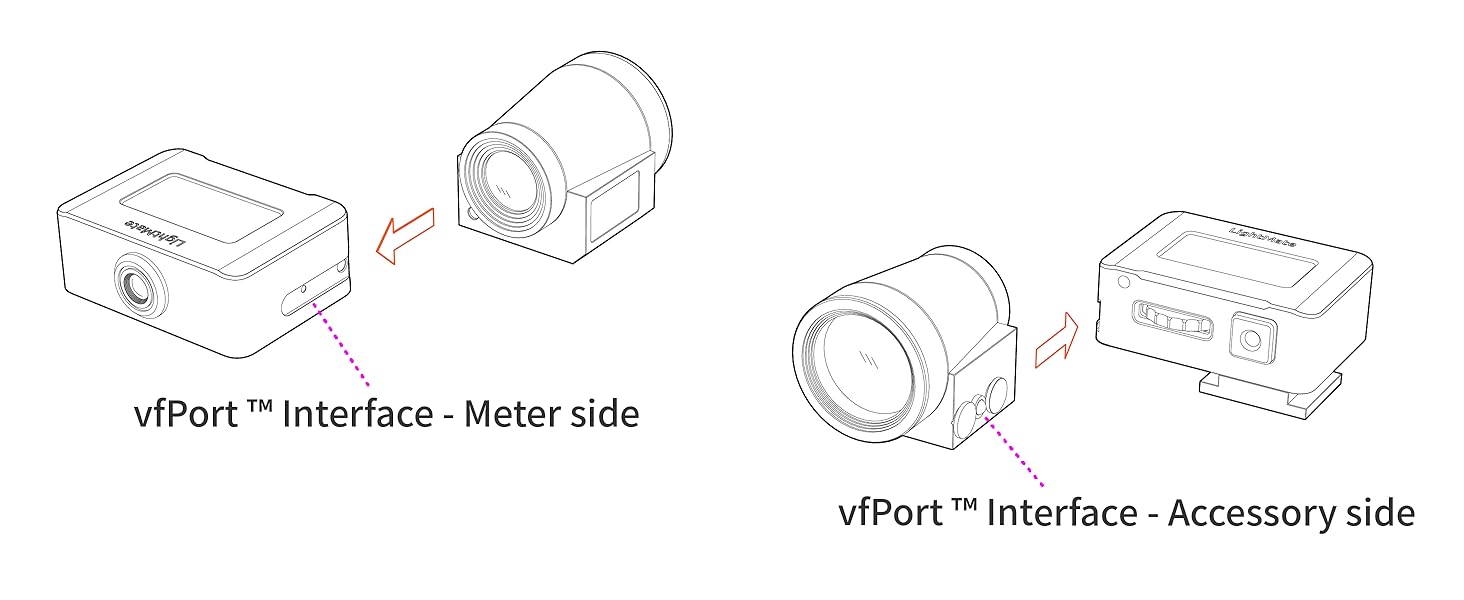
Modular Design
allows for the replacement of different viewfinders or other accessories.
How to disassembly or assembly?
Push to install or remove
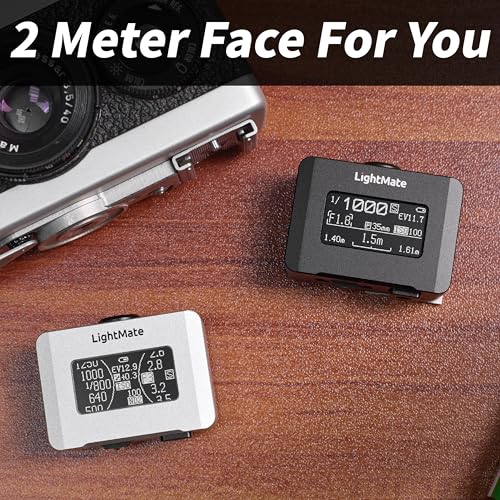
"Classic Digital" and "Classic Dial" metering face
The UI font is clear and sharp, clearly visible in both strong and weak light conditions.
Easy to use!
Quickly switch between shetter speed priority mode and aperture prirority mode metering modes.
Using viewfinder to aim at the target for metering
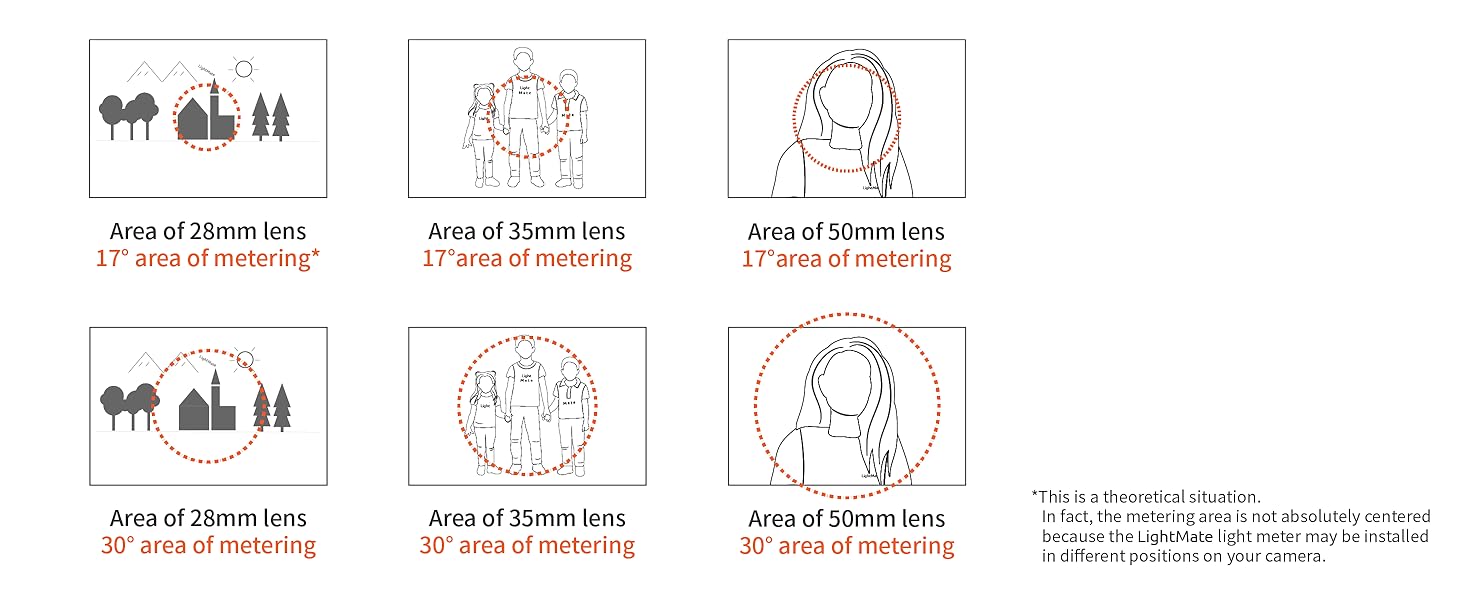
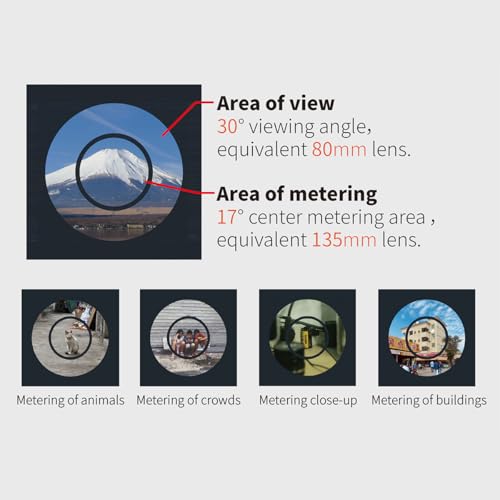
17° angle allows for a central-weighted metering
when using commonly used focal length lenses,such as 28mm,35mm,50mm.Suitable for zone metering, etc.
High image clarity and brightness
thanks to multi-layer coated glass.
Wearing glasses can also be used
The viewfinder can be used separately
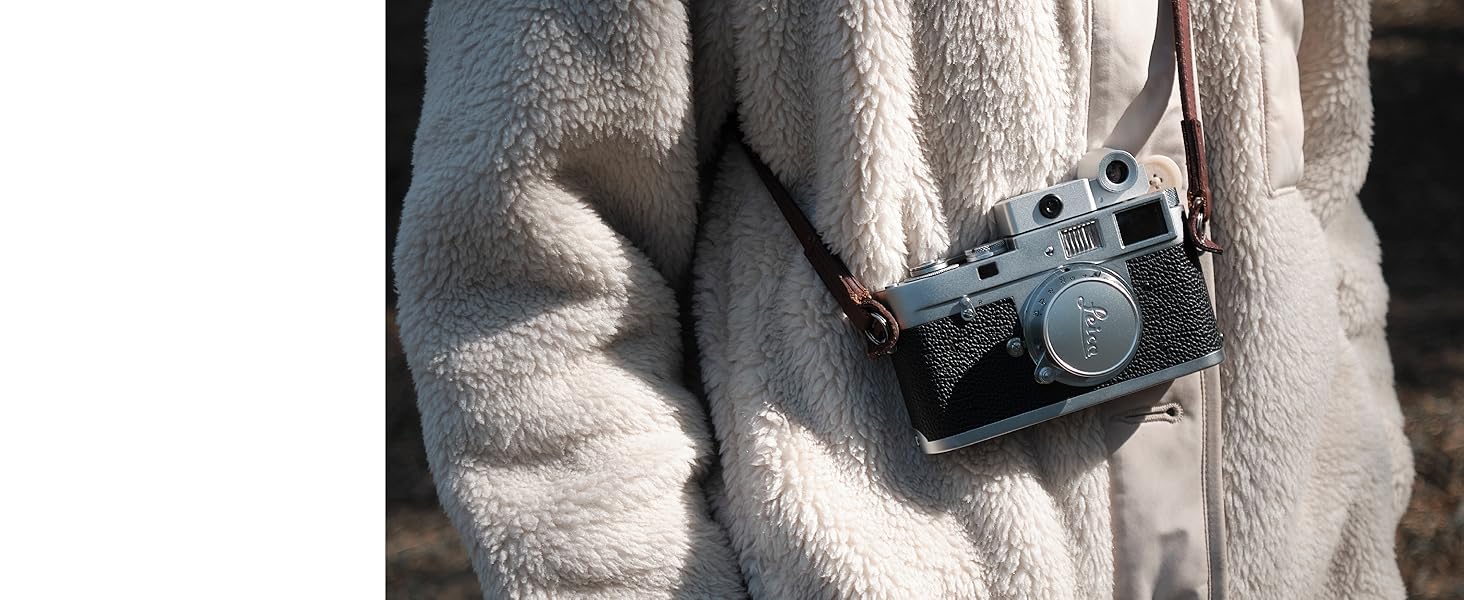
Retro appearance design, can be used as a decoration for your camera.
Suitable for rangefinder or flat top cameras
Suca as barnack cameras, Leica M all seriers film cameras, and others rangefinder cameras
The comprehensive battery life is 20+ hours
You also can be charging by you smart mobile phone just via a USB-C cable!
Product User Manual PDF: bit.ly/3DwnoSy
| Add to Cart Add to Cart Add to Cart Add to Cart Add to Cart Add to Cart | ||||||
| Customer Reviews | — | — | 4.1 out of 5 stars12 | 4.1 out of 5 stars12 | 5.0 out of 5 stars6 | 4.9 out of 5 stars10 |
| Price | $129.00$129.00 | $129.00$129.00 | $84.99$84.99 | $79.99$79.99 | $86.99$86.99 | $86.99$86.99 |
| Metering Angle | 17° | 17° | 30° | 30° | 35° | 35° |
| Product Positioning | Zone Metering | Zone Metering | Street Photography | Street Photography | Street Photography | Street Photography |
| Photometry Range(ISO100) | EV-1.1~EV21.0 | EV-1.1~EV21.0 | EV-1.1~EV21.0 | EV-1.1~EV21.0 | EV-1.1~EV21.0 | EV-1.1~EV21.0 |
| Film sensitivity | ISO1~ISO8000 | ISO1~ISO8000 | ISO1~ISO8000 | ISO1~ISO8000 | ISO1~ISO3200 | ISO1~ISO3200 |
| vfPort Viewfinder | ✔ | ✔ | ✘ | ✘ | ✘ | ✘ |
| OLED Diplay Size | 0.96" | 0.96" | 0.96" | 0.96" | 0.42" | 0.42" |
| Depth-Of-Field Scale | ✔ | ✔ | ✔ | ✔ | ✘ | ✘ |
| Shutter Speed Priority(S) | ✔ | ✔ | ✔ | ✔ | ✔ | ✔ |
| Aperture Priority(A) | ✔ | ✔ | ✔ | ✔ | ✔ | ✔ |
| Manual Exposure(M) | ✘ | ✘ | ✘ | ✘ | ✔ | ✔ |
| Exposure Indicator | ✘ | ✘ | ✘ | ✘ | ✔ | ✔ |
| ND Filter Compensation | ✔ | ✔ | ✔ | ✔ | ✘ | ✘ |
Q & A
Q: Is this light meter accurate in measurement? How does it help me take photos with correct exposure?
A: A light meter is a tool for measuring light, as simple as a thermometer, and it cannot comprehend your creative intentions. It is even somewhat clumsy, unable to provide a WYSIWYG (What You See Is What You Get) experience like the light metering in modern digital cameras. You cannot expect to take ideal photos immediately after purchasing a light meter. It requires you to first learn about photographic exposure methods, think more, and practice more. Many times, we can rely on the built-in light meter of a film camera to take photos. All we need to do is frame the shot, focus, and press the shutter release button. In most cases, we can get a photo with accurate exposure of the subject. This is not because the camera's light metering system is so powerful, but mostly due to the latitude of film (negative film is used in most cases). However, in some situations, overexposed or underexposed photos may also be taken. This is most common in scenes with significant light contrast, where the one-click metering and one-click shooting method is no longer applicable. Please prioritize exposing the subject you want to photograph. In such scenarios, it is necessary to have a thorough understanding of the latitude of the film you are using, and then use a light meter for spot/area metering, and shoot using comprehensively analyzed exposure parameters. Sometimes, it is inevitable that we have to make choices regarding some non-subject scenery beyond the latitude of film, letting it overexpose or underexpose. It is easy to understand that this is not due to the light meter.
Q:What's the difference between the"Single Trgger Metering"mode and the"Continuous Trigger Metering" mode?
A:In the "Single Trgger Metering"mode, clicking the metering button triggers metering each time, and the result will be updated on the screen.It will always maintain the result of this metering and save the most electricity.The light meter will automatically measure at certain time intervals when the "Continuous Trigger Metering" mode is turned on. The metering results will be continuously updated on the screen until exiting this mode.
Q:What is the "Average Metering" mode? How to use it?
A:Using the "Average Metering" mode can measure the average exposure value of a continuous area, it is equivalent to increasing the metering angle of the light meter.Enter the "Average Metering" mode, aim the metering lens at the starting position of the frame, click the M button, slowly move the metering lens to the ending position of the frame, and then click the M button again. The average exposure of the path area will be displayed on the screen.
Q: What should I do if I can't see the screen of the light meter clearly outdoors? How do I access the settings?
A: Increase visibility by increasing screen brightness. The default brightness level is 3, and it can be adjusted up to level 10. Increasing screen brightness will reduce battery life. When the lighting is not strong, please adjust the brightness back to a level that makes the screen visible to save power. Long press the S dial to enter ISO adjustment mode, and then click the M button to enter the settings menu. Modify the screen brightness in the "Settings – LCD and Power" menu.
Q: How to modify the frame size and lens focal length of the "Digital Depth Of Field Scale"?
A: Modify the camera system's frame, lens distance scale unit, and lens focal length in the "Settings – Lens DOF Chart" menu. Only fixed-focus lenses are supported. The frame options include Full for full frame, Half for half-frame, M645 for medium format 6×4.5 size, and L4x5 for large format 4×4 size. The lens focal length supports a range from 10mm to 250mm. There is no need to convert to equivalent 35mm. Simply set it according to the lens focal length marking.


| SKU: | B0F7K1BCFG |
| Weight: | 1.23 ounces |
| Dimensions: | 4.7 x 3.9 x 2.3 inches |
| Model: | 9832+6622 |
| Batteries Included: | 1 AAA batteries required. (included) |
| Manufacture: | LightNova |
Product description
LightMate Area 2S+OV-X1 17° Digital Exposure Meter
-
Silver Version
LightMate Area 2S is a reflective light meter with a sturdy and durable all metal body and an ultra portable size! Its metering lens is 17° and comes with an OV-X1 17° viewfinder for precise metering by aiming at the target. Install it on the top of the camera's cold/hot shoe mount for use. Minimalist appearance design, suitable for almost all film cameras.
What's in the box :
LightMate Area 2S *1 ; OV-X1 17° Viewfinder *1 ; USB-C Cable *1 ; Cross Screwdriver *1; Storage Bag *1


LightMate series of light meters was first designed in 2019 and officially released in 2021. LightMate focuses on the design and manufacturing of small boot mount metering devices. Innovation, high-end, and high reliability are the design concepts of LightMate series metering products. LightMate series of light meters has undergone years of repeated polishing, and the LightMate Lite series has been improved and released successively as Lite, Lite 2, and Lite 2R, and LightMate Area series such as Area, Area 2s. Since its release, the LightMate series of light meters have gained the love of tens of thousands of photographers worldwide!
You can switch betwen Single Trigger Metering Mode, Continuous Trigger Metering Mode, Average Value Metering Mode.
Average metering mode:Enter the average metering mode, press the metering button, and then move between multiple subjects to obtain the average exposure value of multiple subjects. The average metering mode can be used for multi subject exposure measurement, which is equivalent to expanding the metering angle of LightMate Area 2S.
Exposure Compensation, ND filter Compensation.
Depth Of Field calculate. What a magic tool of hyperfocal distance calculate for street photography.
The Aperture step value can be switched between Full and X step, and the ShutterSpeed step value can be switched between Full and 1/3 step.
-
Modular Design
allows for the replacement of different viewfinders or other accessories.
-
How to disassembly or assembly?
Push to install or remove
-
“Classic Digital” and “Classic Dial” metering face
The UI font is clear and sharp, clearly visible in both strong and weak light conditions.
-
Easy to use!
Quickly switch between shetter speed priority mode and aperture prirority mode metering modes.
-


-
Using viewfinder to aim at the target for metering
-
17° angle allows for a central-weighted metering
when using commonly used focal length lenses,such as 28mm,35mm,50mm.Suitable for zone metering, etc.
-
High image clarity and brightness
thanks to multi-layer coated glass.
-
Wearing glasses can also be used
-
The viewfinder can be used separately
Retro appearance design, can be used as a decoration for your camera.


-
-
Suitable for rangefinder or flat top cameras
Suca as barnack cameras, Leica M all seriers film cameras, and others rangefinder cameras
-
The comprehensive battery life is 20+ hours
You also can be charging by you smart mobile phone just via a USB-C cable!
-
-


Product User Manual PDF: bit.ly/3DwnoSy
 Area 2S+OV-X1 17° Silver |  Area 2S+OV-X1 17° Black |  Lite 2R Black |  Lite 2R Sliver |  AirPro Silver |  AirPro Black | |
|---|---|---|---|---|---|---|
| Customer Reviews | — | — | 4.1 out of 5 stars 12 | 4.1 out of 5 stars 12 | 5.0 out of 5 stars 6 | 4.9 out of 5 stars 10 |
| Price | $129.00 | $129.00 | $84.99 | $79.99 | $86.99 | $86.99 |
| Metering Angle | 17° | 17° | 30° | 30° | 35° | 35° |
| Product Positioning | Zone Metering | Zone Metering | Street Photography | Street Photography | Street Photography | Street Photography |
| Photometry Range(ISO100) | EV-1.1~EV21.0 | EV-1.1~EV21.0 | EV-1.1~EV21.0 | EV-1.1~EV21.0 | EV-1.1~EV21.0 | EV-1.1~EV21.0 |
| Film sensitivity | ISO1~ISO8000 | ISO1~ISO8000 | ISO1~ISO8000 | ISO1~ISO8000 | ISO1~ISO3200 | ISO1~ISO3200 |
| vfPort Viewfinder | ✔ | ✔ | ✘ | ✘ | ✘ | ✘ |
| OLED Diplay Size | 0.96″ | 0.96″ | 0.96″ | 0.96″ | 0.42″ | 0.42″ |
| Depth-Of-Field Scale | ✔ | ✔ | ✔ | ✔ | ✘ | ✘ |
| Shutter Speed Priority(S) | ✔ | ✔ | ✔ | ✔ | ✔ | ✔ |
| Aperture Priority(A) | ✔ | ✔ | ✔ | ✔ | ✔ | ✔ |
| Manual Exposure(M) | ✘ | ✘ | ✘ | ✘ | ✔ | ✔ |
| Exposure Indicator | ✘ | ✘ | ✘ | ✘ | ✔ | ✔ |
| ND Filter Compensation | ✔ | ✔ | ✔ | ✔ | ✘ | ✘ |
Q & A
Q: Is this light meter accurate in measurement? How does it help me take photos with correct exposure?
A: A light meter is a tool for measuring light, as simple as a thermometer, and it cannot comprehend your creative intentions. It is even somewhat clumsy, unable to provide a WYSIWYG (What You See Is What You Get) experience like the light metering in modern digital cameras. You cannot expect to take ideal photos immediately after purchasing a light meter. It requires you to first learn about photographic exposure methods, think more, and practice more. Many times, we can rely on the built-in light meter of a film camera to take photos. All we need to do is frame the shot, focus, and press the shutter release button. In most cases, we can get a photo with accurate exposure of the subject. This is not because the camera's light metering system is so powerful, but mostly due to the latitude of film (negative film is used in most cases). However, in some situations, overexposed or underexposed photos may also be taken. This is most common in scenes with significant light contrast, where the one-click metering and one-click shooting method is no longer applicable. Please prioritize exposing the subject you want to photograph. In such scenarios, it is necessary to have a thorough understanding of the latitude of the film you are using, and then use a light meter for spot/area metering, and shoot using comprehensively analyzed exposure parameters. Sometimes, it is inevitable that we have to make choices regarding some non-subject scenery beyond the latitude of film, letting it overexpose or underexpose. It is easy to understand that this is not due to the light meter.
Q:What's the difference between the”Single Trgger Metering”mode and the”Continuous Trigger Metering” mode?
A:In the “Single Trgger Metering”mode, clicking the metering button triggers metering each time, and the result will be updated on the screen.It will always maintain the result of this metering and save the most electricity.The light meter will automatically measure at certain time intervals when the “Continuous Trigger Metering” mode is turned on. The metering results will be continuously updated on the screen until exiting this mode.
Q:What is the “Average Metering” mode? How to use it?
A:Using the “Average Metering” mode can measure the average exposure value of a continuous area, it is equivalent to increasing the metering angle of the light meter.Enter the “Average Metering” mode, aim the metering lens at the starting position of the frame, click the M button, slowly move the metering lens to the ending position of the frame, and then click the M button again. The average exposure of the path area will be displayed on the screen.
Q: What should I do if I can't see the screen of the light meter clearly outdoors? How do I access the settings?
A: Increase visibility by increasing screen brightness. The default brightness level is 3, and it can be adjusted up to level 10. Increasing screen brightness will reduce battery life. When the lighting is not strong, please adjust the brightness back to a level that makes the screen visible to save power. Long press the S dial to enter ISO adjustment mode, and then click the M button to enter the settings menu. Modify the screen brightness in the “Settings – LCD and Power” menu.
Q: How to modify the frame size and lens focal length of the “Digital Depth Of Field Scale”?
A: Modify the camera system's frame, lens distance scale unit, and lens focal length in the “Settings – Lens DOF Chart” menu. Only fixed-focus lenses are supported. The frame options include Full for full frame, Half for half-frame, M645 for medium format 6×4.5 size, and L4x5 for large format 4×4 size. The lens focal length supports a range from 10mm to 250mm. There is no need to convert to equivalent 35mm. Simply set it according to the lens focal length marking.